Be sure to check the bottom of this page for a list of the blogs that I follow. I hope you'll enjoy them too!

Saturday, March 24, 2012

A-B-C it's easy as 1-2-3 (sing in Michael Jackson kid voice!)

Somebody I know has fallen in love with letters and he "has" all of them, just ask him.  I will give you three hints as to who he is: 
1) He is cute, 
     2) He likes cars, 
3) He is cute.

What grandmother wouldn't come up with an excuse to post a picture of their grandchild sleeping?
I had this fabric, another donation from Nana Myra's "I have made too many things out of this fabric already" stash, and I thought I might make a girls jumper out of it. (how cute would that be on the first day of school?).
But, I've been feeling, well, lazy. So instead I decided to make a wall hanging for our little letter savant.

Choose a fabric that you have plenty of AND one that will be easy to center.
After choosing the fabric I selected an old stretched canvas that I had long since grown tired of looking at.
You can always buy one at Michael's or a craft store.  Simple, Simple, Simple.  This one was already wired and ready to hang!


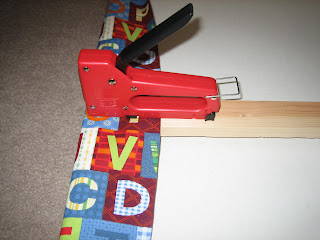
Now, spread the fabric over the canvas evenly.  If you are using a canvas that is not blank make sure you have picked a dark enough fabric so that whatever is on the canvas does not show through.  Also, it is very important that the fabric is very well ironed before you start. Once I centered the fabric, I made sure to stretch it nice and tight over the canvas, Not Too tight or you might make the print on the fabric look wonky, but firm.  Once you have it in place anchor it at the top with a staple gun.  Now, staple all around the frame. Make sure to keep the fabric centered where you want it.


Edges should be tucked in and folded nice and clean and then stapled in place. I left the excess fabric on because I still might want to make a romper out of this fabric once I get tired of seeing it hang on the wall, or once Danny realizes that EVERYONE "has" those letters.  You would do well to trim the excess fabric first, it made it a little more difficult for me to hang up the finished product.


And you are finished.  Now Danny can find "his" letters whenever he needs them!


Thanks for reading.  If you make your own wall hanging please share pictures!

Thursday, March 1, 2012

The Super Hip Walker Bag

Loved this fabric that I found at IKEA and wondered how to turn it into something great.  I decided to make a bag for Nana's new red walker.  While Nana has gone through a lot over these past few months she is still the hippest 90 year old that I know, so I knew she could pull off sporting this fabric.
  
The simple button tab design is meant to hang over the bar of the walker leaving hands free so that Nana can wave at all of her friends as she strolls along.

Since I didn't have a pattern and the one I found on line cost $40.00  (that's right, 40 American dollars for a sewing pattern!) I made the somewhat poor decision to perform a crazy make 'em up of my own.  For this I paid a heavy price in the form of  "what the heck did I do that for" and "where in the hell did I put my seam ripper?".  In the interest of saving the few people who might read this (whom I love dearly), and the one person (whom I love madly!) who might actually make this the same trouble that I encountered, I have decided not to include the directions at this time and instead make another bag incorporating the changes I would make had I only known better.  So, check back for directions on how to make this bag.  I promise I will post it in the NEAR future.
This item can be purchased through my ETSY shop  Baby Cakes Wearable Luv.
The inner pocket is the perfect size for magazines.  The two pockets in front are slightly different from each other in size to accommodate a cell phone, water bottle, paperback novel, eye glasses, or Nana's I-Pad!  Maybe this would make a great stroller bag too?? Stay tuned!


Disco, Rock and Roll Nana!  So happy you are doing better.